
Connecting to Xero
How to Connect JGID to Xero
Connecting JGID to Xero allows you to seamlessly transfer invoices from JGID into your Xero accounting system, helping to streamline your invoicing process and reduce manual data entry.
Once connected, invoices created in JGID can be pushed directly into your chosen Xero organisation.
Before You Start
Before connecting to Xero, ensure that:
- You have access to the correct Xero organisation.
- You have permission to connect third-party applications.
- You're signed into the correct Xero account if you manage multiple organisations.
Tip: If you have access to more than one Xero organisation, double-check that you're connecting JGID to the correct one before granting access.
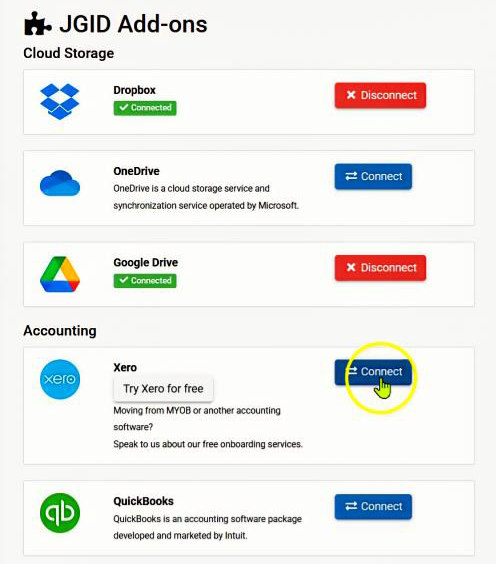
Step 1 – Open the Add Ons Page
- Click the Settings (⚙️) icon in the top-right corner.

- Select Add Ons.
- Locate Xero.
- Click Connect.
Step 2 – Sign in to Xero
You'll be redirected to Xero to authorise the connection.
If prompted:
- Sign in to your Xero account.
- Select the Xero organisation you want JGID to connect to.
- Click Allow Access.
Once authorised, JGID will establish the connection with your selected Xero organisation.
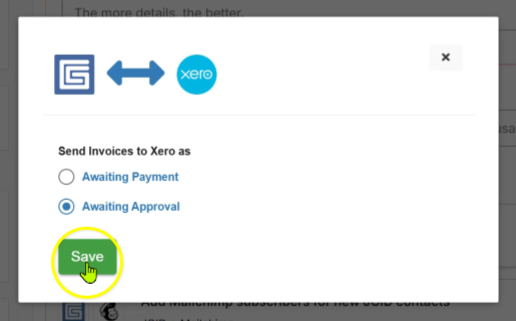
Step 3 – Choose Your Invoice Workflow
After connecting, you'll be asked how invoices should be created in Xero.
You can choose one of two options:
Awaiting Approval (Recommended)
Invoices are created in Xero with a status of Awaiting Approval.
This allows you to review each invoice in Xero before approving and sending it to your customer.
This is the recommended option, particularly when you're first starting to use the JGID and Xero integration.
Awaiting Payment
Invoices are created in Xero as Approved (Awaiting Payment).
This option is suitable if you're confident in your workflow and don't need to review invoices before they're approved.
Sending Invoices
If you choose to email invoices directly from JGID, there's one important step to be aware of.
To enable Xero's automatic invoice reminder emails, you'll still need to open the invoice in Xero and mark it as Sent.
Without this step, Xero won't trigger its automated reminder schedule.
Alternatively, many businesses choose to:
- Push invoices into Awaiting Approval.
- Review and approve them in Xero.
- Send the invoice directly from Xero.
This allows Xero to automatically manage reminder emails.
Note: We'll cover invoice reminders and sending invoices from Xero in a separate knowledge base article.
Best Practice
For most businesses, we recommend:
- Confirming selection of correct Xero organisation.
- Using Awaiting Approval when first setting up the integration.
- Reviewing invoices in Xero before approving them.
- Sending invoices from Xero if you wish to use Xero's automatic payment reminder system.
Troubleshooting
My Xero connection keeps disconnecting
If your Xero connection repeatedly drops out, the most common cause is that the same email address is being used to log into multiple JGID accounts and multiple Xero organisations.
The JGID-Xero integration requires one unique email address per connected Xero organisation.
If the same email address is connected to multiple combinations of JGID and Xero accounts, the authentication can conflict, causing the connection to disconnect.
Recommended solution
Use a unique email address for each JGID account that connects to a different Xero organisation.
Can I connect multiple JGID accounts to the same Xero organisation?
Yes.
If you have multiple JGID accounts that need to connect to the same Xero organisation, this can be configured using a shared connection.
Please contact JGID Support if you'd like this configured for your account.
Frequently Asked Questions
Which invoice status should I choose?
For new users, Awaiting Approval is recommended.
It provides an opportunity to review invoices before they become approved in Xero.
Can I send invoices from JGID?
Yes.
However, if you want Xero to send automatic payment reminders, you'll still need to mark the invoice as Sent in Xero.
Can I send invoices directly from Xero instead?
Yes.
Many businesses prefer to push invoices into Awaiting Approval, then approve and send them from Xero so that Xero manages the reminder schedule automatically.
Why does my Xero connection keep disconnecting?
This is usually caused by using the same email address across multiple JGID accounts connected to different Xero organisations.
Each Xero connection should use a unique email address.
Can two JGID accounts connect to the same Xero organisation?
Yes.
This is supported using a shared connection.
Please contact JGID Support to have this configured.
Summary
To connect JGID to Xero:
- Go to Settings → Add Ons.
- Click Connect next to Xero.
- Sign in to Xero.
- Select the correct Xero organisation.
- Click Allow Access.
- Choose whether invoices should be created as Awaiting Approval (recommended) or Awaiting Payment.
Your JGID account is now connected to Xero and ready to transfer invoices.